

How to Bridge wZNN to Native ZNN on the Network of Momentum (NoM)
An Alien Holds Your Hand and Helps You Cross the Ether
The Network of Momentum (NoM) is where wZNN transforms into ZNN, powering fast, secure, feeless exchange and smart contract execution. Zenon is designed to extend Bitcoin’s scalability without compromising its security, using a dual-token economy with ZNN and QSR.
This guide shows you how to convert wZNN (an ERC20 token on Ethereum) to ZNN, NoM’s native ZTS token. Confused about terms like ERC20 or ZTS? Don’t be. We’ll hold your hand all the way through.
Why Bridge from wZNN to ZNN?
Bridging from wZNN to ZNN lets you fully engage with NoM’s unique features:
-
Feeless transactions: Send and receive any ZTS (Zenon Token Standard), on NoM without transaction fees.
-
Enhanced security: A wrapped ZNN relies on Ethereum’s security and carries extra risk due to the complexity of the controlling smart contract. It should only be used to interact with Uniswap’s liquidity pool. By bridging to NoM, you’ll benefit from a token standard explicitly designed with security as a priority.
-
Reward opportunities: Earn QSR by staking ZNN and securing the network, or earn more ZNN by delegating it to a Pillar and increasing it’s weight.
-
Access to the s y r i u s wallet: A secure and user-friendly wallet to interact with NoM. It supports trading through peer-to-peer swaps, acclaimed for its easy to use design.
Bridging puts your ZNN on the network it was built for.
Preparing for the Bridge ⚠️
To ensure a smooth and safe bridging experience, here are some essential tips:
-
Verify, then trust: Double-check you’re using the correct contract addresses and visiting the right websites.
-
Secure your wallet: Keep your private keys and wallet passwords to yourself. Never share them.
-
Stay updated: The cryptocurrency ecosystem is constantly evolving. Always use the most current software or app versions.
Step-by-Step Tutorial: Bridging wZNN to ZNN
Transitioning from wZNN to ZNN is a straightforward process, designed to integrate you seamlessly into the Network of Momentum’s (NoM) ecosystem. Here’s how you can start enjoying feeless transactions, enhanced security, and the innovative rewards system that NoM offers:
1. Downloading and Installing MetaMask
(skip if already installed)
MetaMask is a popular Ethereum wallet that allows you to manage your Ethereum tokens, including ERC20 tokens like wZNN, and connect to decentralized applications. We recommend installing it as a browser extension, instead of using a less secure mobile device. Follow these steps to download and install MetaMask:
-
Visit the Official MetaMask Website: Open your web browser and go to metamask.io. This ensures you’re downloading the authentic version of the wallet.
-
Choose Your Browser: MetaMask is available as a browser extension for Chrome, Firefox, Brave, Edge, and Opera. Click on the download button for the browser you are using.
-
Add the Extension: Click on the “Add to [Browser Name]” or “Get” button, depending on your browser. This will take you to your browser’s extension store. Confirm the addition of the extension.
-
Install MetaMask: Follow the prompts to add the extension to your browser. After installation, the fox logo should appear in your browser’s extension area.
-
Set Up Your Wallet: Click on the extension icon in your browser to open the wallet. You’ll be given the option to create a new wallet or import an existing one. If you’re new to MetaMask, select “Create a Wallet.”
-
Secure Your Wallet: Follow the instructions to create a strong password. MetaMask will then provide you with a secret recovery phrase. Write this phrase down and keep it in a secure place, we recommend using KeePassXC, an open source and cross-platform password manager, to create an encrypted vault stored in a cloud service such as Dropbox, Google Drive, or Apple’s iCloud. This phrase is the only way to recover your wallet if you forget your password or lose access to your computer.
-
Confirm Your Recovery Phrase: As a security measure, you’ll be asked to confirm your recovery phrase. Follow the instructions to ensure your recovery phrase is correctly noted.
-
Wallet Ready: Once set up, your MetaMask wallet is ready to use.
Remember, keeping your recovery phrase secure is critical. Never share it with anyone, and avoid storing large sums of money in a wallet with internet access.
2. Verifying the wZNN Contract Address
The first step in the bridging process is to ensure you’re interacting with the legitimate wZNN token on Ethereum. This is crucial to prevent any mishaps or interactions with counterfeit tokens.
wZNN contract address: 0xb2e96a63479c2edd2fd62b382c89d5ca79f572d3
-
How to Verify: Visit the contract address and inside the Etherscan explorer and verify that the contract creator is
0x073a8C4c668c3a42CF5DF61eC84a7E83872902F8, the account of the temporary bridge admin. Bookmarking the official Etherscan page for wZNN can help you quickly verify the contract address in the future. -
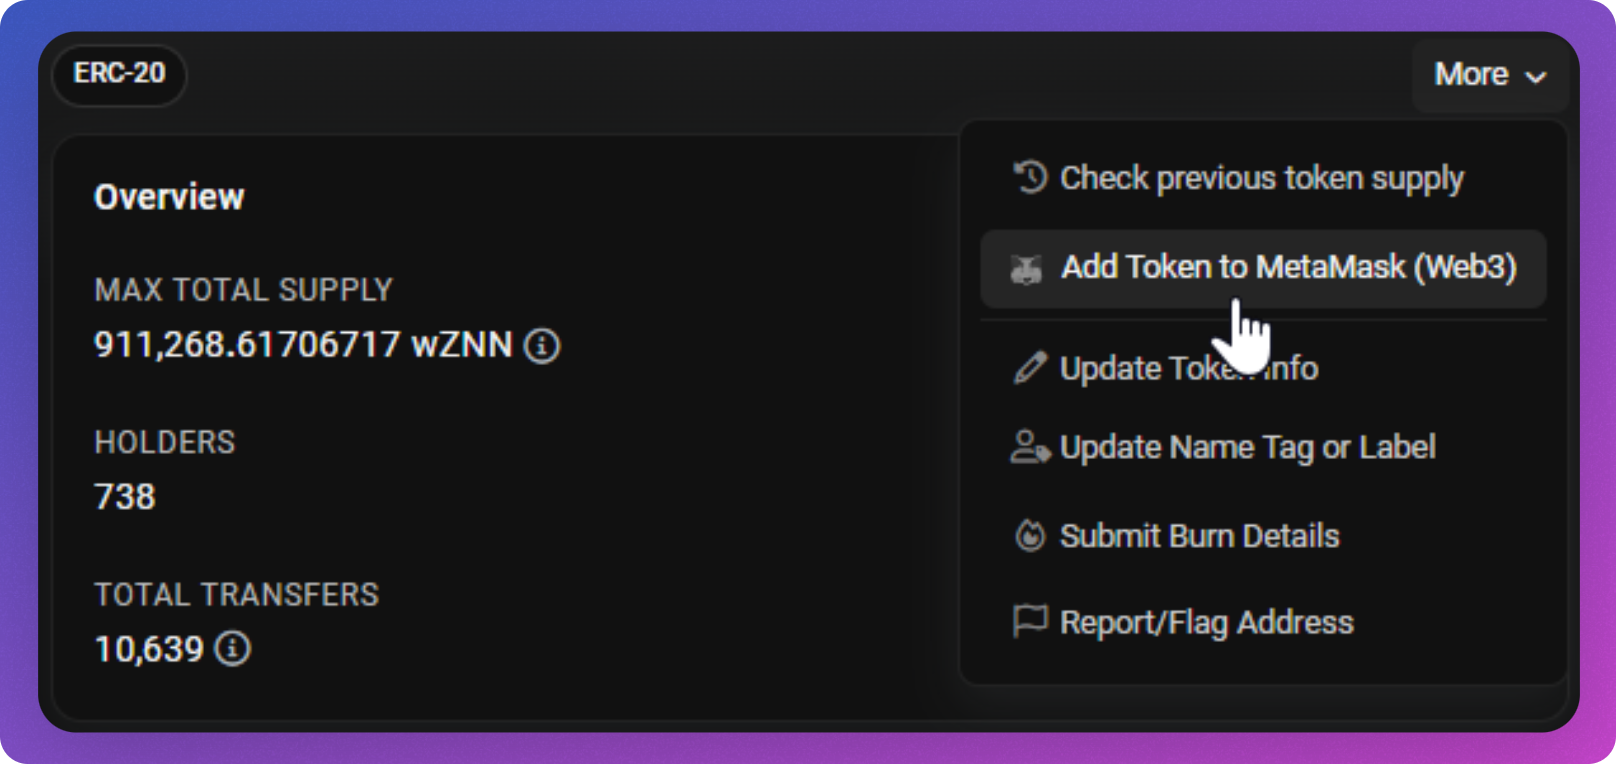
Adding wZNN to MetaMask: After verifying the contract address, you can easily add it to your MetaMask wallet by looking for the
Add Token to Metamaskicon from a reputable token tracking website. Our favorites include Etherscan, GeckoTerminal, CoinMarketCap, Coingecko and Dextools. The location of the icon varies from site to site, but hunting for the fox icon can be an enjoyable task. On Etherscan, it’s hidden under themoredropdown:
3. Funding Your Ethereum Wallet
You’ll need some ETH in your Ethereum wallet to cover the transaction fees associated with bridging tokens. Although transactions within NoM are feeless, the initial bridge involves standard Ethereum blockchain transaction fees.
-
Adding ETH: Transfer ETH to your wallet from an exchange or another wallet. Make sure you are adding funds to Ethereum Mainnet and keep an eye on gas prices to choose a cost-effective time for your transaction. If you need more help with this step, we recommend this video.
-
Configuring the MEV Blocker RPC: After ensuring your wallet is funded, the next crucial step is to configure your Ethereum wallet with an MEV (Miner Extractable Value) Blocker RPC. This configuration helps protect your transactions from being exploited by front-running bots on the network.
How to Configure MEV Blocker RPC:
-
Open MetaMask: Click on the MetaMask extension in your browser to open your wallet.
-
Access Settings: Click on the avatar icon in the top-right corner, then select “Settings” from the dropdown menu.
-
Networks: Navigate to the “Networks” menu and click on “Add Network” to enter the details for the MEV Blocker RPC.
-
Enter Network Details: Fill in the network details as follows:
Network Name:
MEV Blocker (Ethereum Mainnet)
New RPC URL:https://rpc.mevblocker.io
Chain ID:1
Currency Symbol:ETH
Block Explorer URL:https://etherscan.io -
Save and Use: After entering the details, click “Save.” Make sure to select the MEV Blocker RPC from the wallet’s main dropdown.
4. Buying wZNN from Uniswap
Now that your Ethereum wallet is ready and secure, the next step is purchasing wZNN through Uniswap, a decentralized exchange that allows users to swap various Ethereum-based tokens.
Understanding Liquidity Pools: A liquidity pool is a collection of funds locked in a smart contract. Users, called liquidity providers, add an equal value of two tokens in the pool to create a market for those tokens. In return, they earn trading fees from the trades that happen in their pool, proportional to their share of the total liquidity.
Why Use the ETH-wZNN Liquidity Pool? The liquidity for wZNN is concentrated in the ETH-wZNN LP because it is currently incentivized by the Zenon Network’s Orbital Program. This means that by locking ETH and wZNN you can earn a share of NoM protocol ZNN and QSR emissions. For this reason, it is recommended to buy wZNN using ETH.
How to Buy wZNN:
-
Go to Uniswap: Navigate to app.uniswap.org.
-
Connect Your Wallet: Click on the “Connect Wallet” button and select MetaMask.
-
Select the ETH in You Pay: Click on the “Select a token” button and paste the wZNN contract address:
0xb2e96a63479c2edd2fd62b382c89d5ca79f572d3or the ETH-wZNN pair contract address:0xdac866a3796f85cb84a914d98faec052e3b5596d. This will load the ETH-wZNN trading pair. -
Swap ETH for wZNN: Enter the amount of ETH you want to swap for wZNN. Uniswap will automatically show you the amount of wZNN you’ll receive based on the current exchange rate and liquidity.
-
Adjust Slippage Settings: Click on the settings icon to adjust your slippage tolerance. Slippage is the difference between the expected price of a trade and the price when the trade is executed. A higher slippage tolerance may increase the chance of your transaction going through during periods of high volatility.
-
Confirm the Swap: Review the transaction details, including any fees and the expected amount of wZNN. Click on “Swap” when you’re ready, then confirm the transaction in MetaMask.
-
Transaction Complete: Once the transaction is confirmed on the Ethereum blockchain, the wZNN tokens will appear inside your MetaMask wallet. You may need to add the wZNN token manually if you skipped the last part of step 2.
By following these steps, you’ll have successfully purchased wZNN using ETH, preparing you for the next stage of bridging your tokens to NoM.
5. Downloading and Installing the s y r i u s Wallet
Before you can complete the bridge from wZNN to ZNN, you’ll need to download and install the s y r i u s wallet. This wallet is designed for interacting with the Network of Momentum (NoM) and all ZTS tokens.
Choose Your Platform:
-
Windows: Download s y r i u s.
-
Mac: Download s y r i u s.
-
Linux: Download s y r i u s.
Installation Steps:
-
Download the Wallet: Click on the download link corresponding to your operating system.
-
Extract the Files (if necessary): For Windows and Linux, you might need to extract the .zip file to a location of your choice on your computer. For Mac users, drag the s y r i u s icon to your Apps folder.
-
Open s y r i u s: After installation, open the s y r i u s application.
-
Create, Import, or Use a Hardware Wallet: You can create a new wallet or import an existing one using your seed phrase, or soon use a Ledger hardware wallet device.
The same security recommendations that apply to storing your MetaMask seed phrase also apply here. You may choose to export the seed into an encrypted file with a passphrase.
-
Sync Process: before using s y r i us, it’s important to wait for the embedded node to finish syncing (wait for the circular indicator in the top right corner to turn green).

Alternatively, feel free to connect to the ATS public node
3. Connecting to the Zenon Bridge
With your Ethereum wallet funded, the next step is to connect to the Zenon bridge, which facilitates the conversion of wZNN to ZNN.
- Accessing the Bridge: Go to the official Zenon bridge website bridge.zenon.network and connect your Ethereum wallet where your wZNN tokens are stored.
4. Bridging Your Tokens
Once connected, follow the bridge’s instructions to convert your wZNN to ZNN. This process typically involves selecting the amount of wZNN you wish to bridge and confirming the transaction on your Ethereum wallet.
- Transaction Confirmation: Double-check the transaction details. Confirm the transaction in your wallet, and wait for it to be processed on the blockchain.
5. Receiving ZNN in Your s y r i u s Wallet
After the transaction is confirmed, your ZNN will be available in your s y r i u s wallet, ready for you to use within the NoM ecosystem.
- Checking Your Balance: Log into your s y r i u s wallet to see your ZNN balance. If this is your first time using s y r i u s, you may need to download and set up the wallet from the official site.
Final Steps and Considerations
After completing the bridge, explore the various features NoM offers, like staking ZNN for QSR rewards or participating in peer-to-peer swaps. Remember, the world of cryptocurrency is always evolving, so stay informed and secure in your digital journey.
Comments
Loading comments…